
Select Switching or Bridging of Master/Slave Port?

This question may arise when we want to create multiple interfaces at the Mikrotik to be one segment. There are some options that we can use, including IE can use Bridging techniques or use the Switching harness mode Master Slave port and Port. Both give the same results as if, but actually there is a difference.

The configuration of the Master/Slave Switch Port using a special switching chip embedded on RouterBoard, so as not to overload the CPU. Mikrotik will not get too big a burden of switching on the CPU even though his passing traffic is very high. The illustrations were like in the picture above. From the illustration above pictures it can be seen that acts as a Master Port eth2 and eth3-5 as a Slave Port that uses the switching chip.

Ilustrasi Switching Master Slave Port
The configuration of the Master/Slave Switch Port using a special switching chip embedded on RouterBoard, so as not to overload the CPU. Mikrotik will not get too big a burden of switching on the CPU even though his passing traffic is very high. The illustrations were like in the picture above. From the illustration above pictures it can be seen that acts as a Master Port eth2 and eth3-5 as a Slave Port that uses the switching chip

Master Port eth2 and eth3-5 as a Slave Port that uses the switching chip

The ability of Switching Ports varies for each switching chip embedded on RouterBoard.

Bridging Port
Bridging Port ilustration

By doing bridging, we can combine several different interfaces into one interface ethernet for example cement with wireless, which cannot be done by the method of Master/Slave port switching. In addition we can apply to bridging firewall filter rule, where at switching cannot be done except for Mikrotik Router Switch Cloud (CRS).
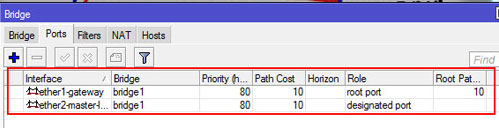
By doing bridging, we can combine several different interfaces into one interface ethernet for example cement with wireless, which cannot be done by the method of Master/Slave port switching. In addition we can apply to bridging firewall filter rule, where at switching cannot be done except for Mikrotik Router Switch Cloud (CRS).
protocol STP (Spanning Tree Protocol) and RSTP (Rapid Spanning Tree Protocol).

Using the bridge we can cope network loops with ease, using protocol STP (Spanning Tree Protocol) and RSTP (Rapid Spanning Tree Protocol).

So in essence the second of these methods is the same, just the difference in the speed vs features. If you are already a mikrotik high specification, and the traffic is not too great, can use a bridge only. But if instead you better wear switching.

That's the easy way to choose Select Switching or Bridging of Master/Slave Port?
hopefully helpful articles.

Comments

Popular posts from this blog

Mikrotik Script for DNSDynamic, DDNS and IP-Change Update

I often use this script to automatically update Dynamic IP on Mikrotik. Condition of dial-up done by Mikrotik, so the modem using Bridge mode, and you've been setting up email on the Tool >> email in your Mikrotik. Download here : And for other dynamic DNS providers please download this script: Script for DDNS and IP-Change DNSDynamic here ______________________________________________________________________________ This article is translated version to English from Bahasa Indonesia by Google. Original post was write by cirebonwifi

Setup VPN Client on Mikrotik Router

For some reason, we want to make the proxy as a VPN client and forward the entire connection from the client to the VPN server Mikrotik. The following are the steps to configure Mikrotik as VPN-Client: IMPORTANT: Don't setup your Mikrotik RouterOS remotely. You have to be connected via the LAN interface, otherwise you will cut the connection (access to the router) and you will not be able to access it remotely any more. 1.Update Router OS on your Mikrotik router to latest version (at least version v5.8 ) 2.Connect to your Mikrotik router via WinBox. 3.Setup the DNS servers manually to Google DNS: IP -> DNS -> Settings -> Servers 8.8.8.8 and  8.8.4.4 4.Write down the default gateway IP address of your Internet provider (ISP) and remove the default-route (Dst. Address = 0.0.0.0/0 routed via your ISP GW) from the routing table. If you don't use DHCP Client please follow the STEP 5. 5.Go to IP -> DHCP Client and disable the "Add Default Ro...

How to Install Windows XP on a VPS by using Custom Vultr ISO Win XP Pro

Here is how to install Windows XP on a VPS by using Custom Vultr ISO Win XP Pro that was made specifically to be able to run on a VPS Vultr. Using VPS Vultr to install Windows XP, we can later do a RDP (Remote Desktop Protocol) Windows XP in Vultr easily and cheaply. As I've described in my previous article about Tutorial How to Install Mikrotik in VPS Vultr, that Vultr this is the VPS vendor that offers cheap VPS package price. With $5 we can already rent a VPS with the specifications of 1 GB of RAM, 25 GB of SSD, 1 Core CPU Bandwidth, and 1 TB. Why Use Windows XP? I use windows xp than any other version of Windows newer because Win XP it's efficient in the use of the RAM. When compared to other versions of windows, especially windows server, then a windows xpRAM consumption more efficient. This greatly helps for those of us who are going to use a lot of applications in windows XP RDP in VPS Vultr. By using the windows operating system will allow you to more u...